How to make a Sculptie in Sculpt Studio. Part I: Overview
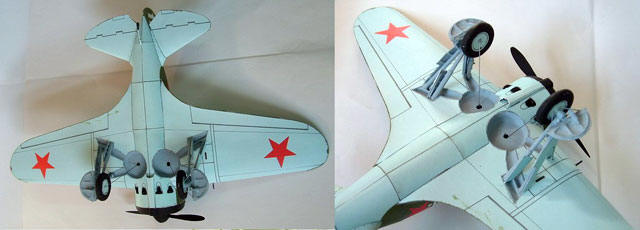
THI is working on a new plane a Polikarpov I-16. This plane was the first production military aircraft to get retractable landing gear. The designer was hedging his bets and designed a stable tripod when extended so the gear was stable when landing on Russia's unimproved airfields. However, rather than one strut and a wheel and a simple cut out, this one has three struts, three cut outs and a hinged flap. This necessitated making Two sculpties. One for the extended shape and one for the retracted shape, The extended shape was complicated as this model of a the plane shows.
The first step was the build the gear in standard prims to use as a scaffold. This has all the basic shapes necessary to create the look of the finished landing gear, The object in red are the same objects moved to represent the entire assembly as if retracted into the wing, as there will be a texture swap during the gear retraction animation so that the landing gear will be nearly flush to the wing as on the real plane.


Next one has to chose the number of slices, plates, coins, prims, or what ever you call the items used to create the sculptie. For such a complicated shape and at the suggestion of my co builder at THI, Duke Elliott, I bit the bullet and used a count of 128 slices of 8 points each.

There were four shapes used on the 129 slices, the tire profile, lathed by hand around the Axle. a simple circle, a simple sharp edges rectangle, and the "pole" slice. To make the pieces look separate, each segment was terminated by two shapes, followed by two "poles". the space between pole slices is invisible so if you have the count, you can make several "separate pieces into one object. But because of "Level of Detail" (LOD) considerations you want to make at least two or three co planar slices to give the object a sharp edge, and then two or three also coplanar "poles" so as to not lose the separation or detail when you zoom out and away from he object. Planes tend to be seen at great distances , even in SL.


The next step after arranging the slices in the way you want, is to render them out into a sculptie texture. The bounding box is arraigned so that it allows the wheels to touch the ground but still encompass the whole of the slices. Here one can see on the plane the angle nec3essary for it to touch the ground, flat to the runway on the plans here.


The rendered texture is applied to a sculpted object generated by Sculpt studio to be the same size and volume as the bounding box below. After I made the extended version I went back and moved the slices around to make the retracted version so that both occupy the same space within the bounding box so the piece wont's move or snap much when the script changes the sculpt texture during the animation. A little snapping is unavoidable, but make it as small and minor as you can.

Here are all of the Pieces arranged and mirrored to attach to the plane. both extended and retracted, bot left and right.

And finally here we see the landing gear attached to the plane, with the 'retracted version prims used to show where the "hole" in the wings and lower fuselage will have to be in the Alpha Channel. I will go into more building detail for a whole project later, but I thought I would show how this was done in a basic overview so that you wont' be that intimidated by sculpties and Sculpt Studio, should you choose to use this amazing tool.
--Karl
posted by Karl Reisman at
11:08 PM
![]()


0 Comments:
Post a Comment
Subscribe to Post Comments [Atom]
<< Home